
Toadstool Needle Book by Cassie Barden
 Woodland-themed motifs are a favorite for us both, so coming up with a new design to go with the Woodland Sewing Set was really fun. And who doesn’t love the iconic, retro toadstool? The amanita muscaria is a symbol of good-luck, famous for forming “fairy rings,” and is quite poisonous, causing delirium and hallucinations. Eye-catching and adorable (as fungi go), this colorful character makes a great appliqué motif, and sewn up as a needle-book amanita muscaria will definitely earn a place in your sewing kit. This needle book is very easy to put together with a few colors of felt, embroidery floss and only two stitch types.
Materials
• 1 8×8” sheet of wool-blend felt in each of the following colors:
• Light tan, for mushroom stem
• Mushroom (a medium brownish-grey), for book cover
• Red, for mushroom cap
• White, for mushroom spots
• Spring green, for grass
• Dark olive green, for book lining
• Forest green, for book pages
• Embroidery floss in white, red, spring green, mushroom and dark olive green.
• Freezer paper
• One size 4 sew-on snap
Instructions
1. Transfer the template designs to your felt using the freezer paper. (For more info on using freezer paper, see the section on design transfer here).
2. Cut out all the designs using small, sharp scissors and peel off the freezer paper.
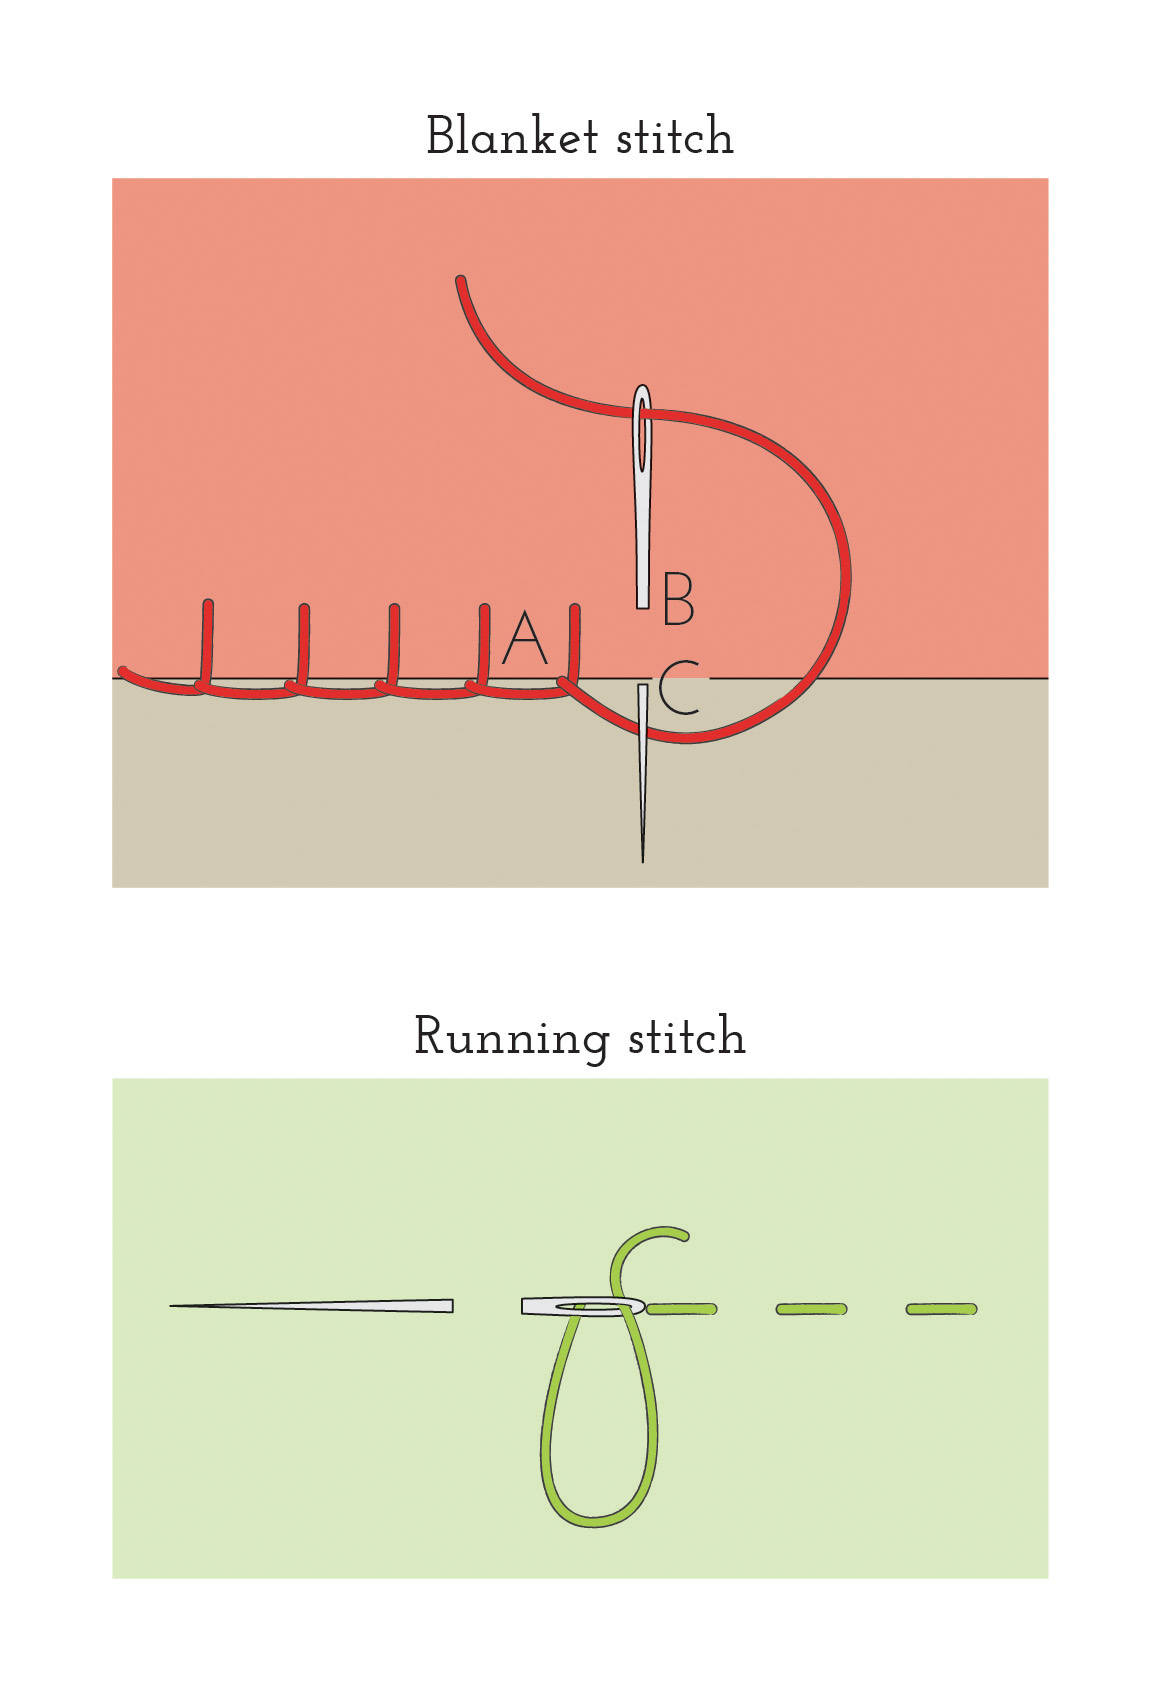
3. Referring to the embroidery illustrations below, use a blanket stitch and 2 strands from a skein of matching embroidery floss, stitch the toadstool pieces to the mushroom-colored cover in the following order:
i. Light tan toadstool stem
ii. Red toadstool cap
iii. Spring green grass (I recommend using a small running stitch for this one, as those points can be rather fussy with a blanket stitch)
iv. White spots

4. Using the matching olive embroidery floss, stitch either side of the snap to the center bottom edges of the needle book lining felt (see photos or templates for reference on the snap placement).
5. Layer the lining with the cover, wrong sides together, and using the mushroom colored embroidery floss, blanket stitch around the entire edge to secure them together.
6. Center the two forest green pages on the lining side of the needle book. Using matching top and bobbin threads, machine stitch across the spine of the book twice.


7. Fill the pages with your pins and needles, and you’re done!

Download the pattern templates (and a pdf of the whole project) here: and when you’re finished, show off your completed project by adding a photo of your Mushroom Needle Book to our Everyday Handmade Flickr group.
For more info on Everday Handmade, project photos from the book, information about trunk shows, and more, visit our website: handmadeisawesome.com
And Now, A Challenge!
Now it’s your turn! We’d love to challenge you to come up with your own needle book pattern! Use Cassie’s pattern above as a starting point or create your own from scratch using Adrienne’s Tips for Working With Felt to get started. Just make sure to incorporate felt into your final design. Send Generation Q a photo of your needle book to win a fabulous prize!
Note: Photos of entries in the Needle Book Challenge are due to megan@generationqmagazine.com by December 31. Be sure to include your full name and postal addy in the accompanying e-mail. The big reveal will be posted January 5.


COMMENT #1
Have I ever mentioned that I’m a big fan of fungus?
I might have to try my hand at this. I mean, I DID win a stack of felt fats, after all. But they’re so pretty I haven’t wanted to cut into them.
COMMENT #2
Darling! I added a post about it on my blog to send more fungi-lovers your way!
COMMENT #3
Brilliant! Never seen a cuter needle book, EVER!
COMMENT #4
This was so stinkin’ cute. I am making it a project with my daughter to get her started with needle crafts!
COMMENT #5
merci
c’est tres sympa et trop beau
COMMENT #6
trop beau j adore bravo c est une merveille mis ton lien sur mon blog bisesssssssssssssssss
COMMENT #7
Awwwwe…. I was just going to rush off and design a needlebook when I saw this was from 2011! Never mind – I’m going to make this cute mushroom anyway. Thanks for a great pattern and tutorial.
COMMENT #8
hello I find this needle case so cute that I want to do one for me and one for my best friend
Thank you very much
michele
COMMENT #9
Cheer….so cute and beautiful!!!! Love it so much….
COMMENT #10
Love this cute little design – I am thinking it will be a great project for my ASG group. Thanks so much for sharing.
COMMENT #11
Thank you!!! Wonderful project!! :))
COMMENT #12
Thanks so much love pin holders and pin cushions…
COMMENT #13
This pattern is so cute and cheerful..getting my felt out now..Thanks for sharing.
COMMENT #14
Thank you very much! I think this is lovely and cannot wait to make a few for my friends. Cute Christmas present idea! Kind regards, Cheryl
COMMENT #15
How adorable. Going to make a few of these so that they are handy and I can sew where ever I want in my house. Thanks for the pattern and tutorial.
COMMENT #16
love your patterns
COMMENT #17
How do you hide the starting and ending knot on the blanket stitch?
COMMENT #
Deborah, I will admit that I don’t try to hide the knot if it’s on the back of the work. I just make it as tiny and tight as possible. If you have two or more layers and can work the first and last stitches through just the top layer, that could work as well. -Jake
COMMENT #18
Such a gorgeous pattern. Just love it. Thank you!
COMMENT #19
Please tell me where did the tiny pink mushroom head pin in the picture come from?
COMMENT #
Hi Tulsi:
We did not style that shot, and don’t know where the pin came from. The picture was given to us by the designer and is about 3 years old. I’ll send an email to her and see if she has an answer for you though.
Thanks,
Jake
COMMENT #
It looks like the pin was made using polymer clay, baked and glazed. That’s what I’m going to try, anyways. It’s too cute!!